
Our bathrooms are tiny. We’re talking MAJORLY cramped and inefficient. Our upstairs bath gets the most traffic in our house…2 adults and 2 kids getting ready for the day in 39.5 square feet (and that measurement is generous). While we’d love a bigger bathroom (or our very own master bath), it isn’t in the cards right now.
What is in the cards? Renovating! Now, I’ve tackled a few renovations before (including a bathroom) so I have a bit of experience under my belt. And I research things like crazy (my husband might say, “obsessively”). BUT…we did call in an expert for the electrical work (we had an old, scary light fixture replaced and added a new fan light). Once the electrical work was out of the way, I was able to start on the fun stuff!


That subfloor with the, um, beautiful pattern? Nice, huh? When I pulled up the existing tile, I found pieces of the original brown tile still attached to the subfloor. Seriously?! Someone applied the tile in 1977 directly to the subfloor! And there was no rot (probably because someone before us applied tile backer board to the original tile and added new tile on top of that. Friends, please don’t do this). And that leftover wallpaper! She’s a beaut, isn’t she? Yep, our windowless bathroom was once-upon-a-time covered in blue, brown and gold patchwork wallpaper. With dark brown trim. Hey, it was the 70s, right? What I forgot to take a picture of was our lovely sink console…picture a too-short counter, topped with ivory Formica with glittery gold swirls throughout. We lived with this sink for 10+ years (for real).
So after I ripped the existing the tile down to the subfloor, it was time to install our tile backer board (I used cement tile backer board found at Home Depot…easy to to score and snap to fit over your subfloor like a puzzle). I screwed the backer board to my subfloor and used pre-mixed thinset mortar to smooth between the cracks. At this point I preset my tile, making all my cuts (with the most basic manual tile cutter you can get). Because I was using wood-look ceramic tile, I wanted to have very small grout lines so I used the smallest spacers I could find. Once it all fit together nicely, I pulled everything up, slapped on the mortar in small sections and ran my square-notched trowel over the mortar before placing the tile with the tiny spacers and let it cure. I used a siliconized grout and the learning curve was a little rough (it comes out of the tube fast), but once I got it, we were gold.


Inbetween the backer board and tile installation, I primed and painted (after removing those last few tidbits of that pretty 70s wallpaper)…we chose Behr Atmosphere (a very pale blue) in Satin Enamel. Then I painted and installed my trim board. Let’s take a moment to admire the trim…


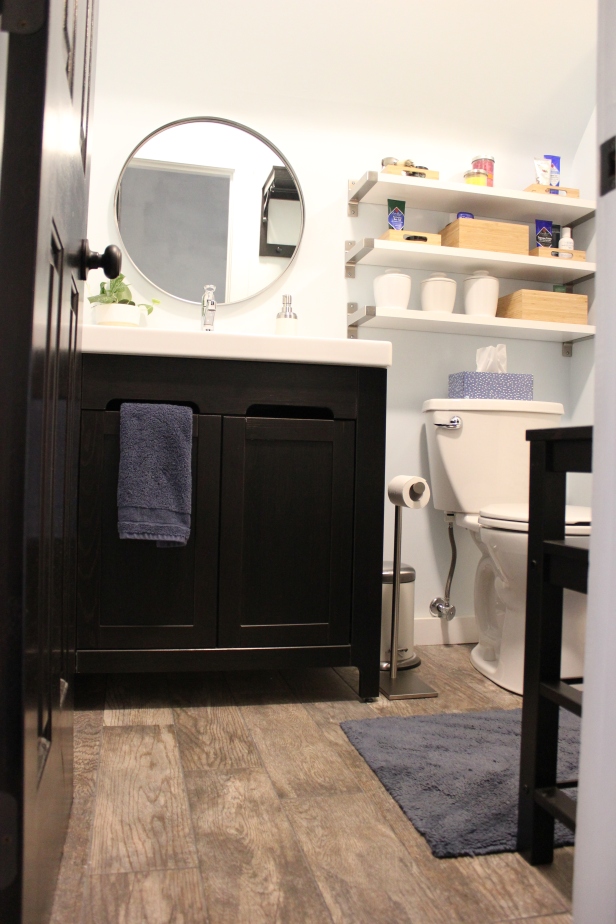
I couldn’t wait to install our new toilet and sink console! I really missed having the luxury of 2 bathrooms (especially 2 toilets). Toilet installation isn’t exactly fun, but it’s not too difficult. I had shut off all our water valves prior to tiling and painting and stuffed an old rag over the toilet pipe to prevent nasty fumes from entering our house (don’t forget to remove that rag before installing your toilet). Selecting a toilet is fun business, my friends. We ended up choosing an American Standard Cadet 3 Right Height 2-piece 1.28 GPF Single Flush Round—Water Sense approved! We like saving water here. Our sink and console came from IKEA (an old discontinued deal that we found waaaaaay back and kept boxed under our bed until we were ready to renovate). The faucet is a Moen Kleo Single Hole Single-Handle Mid-Arc in Chrome.


Having a functional bathroom again made me jump for joy (even though I still had lots of finishing touches to complete)! It took a few tries to get the faucet hooked up correctly without leaking. I ended up replacing all the old pipe pieces with fresh new pipes and then had no more leaking issues (I knew I should have done this from the start, but I got overly excited—and tired of making multiple trips to Home Depot).
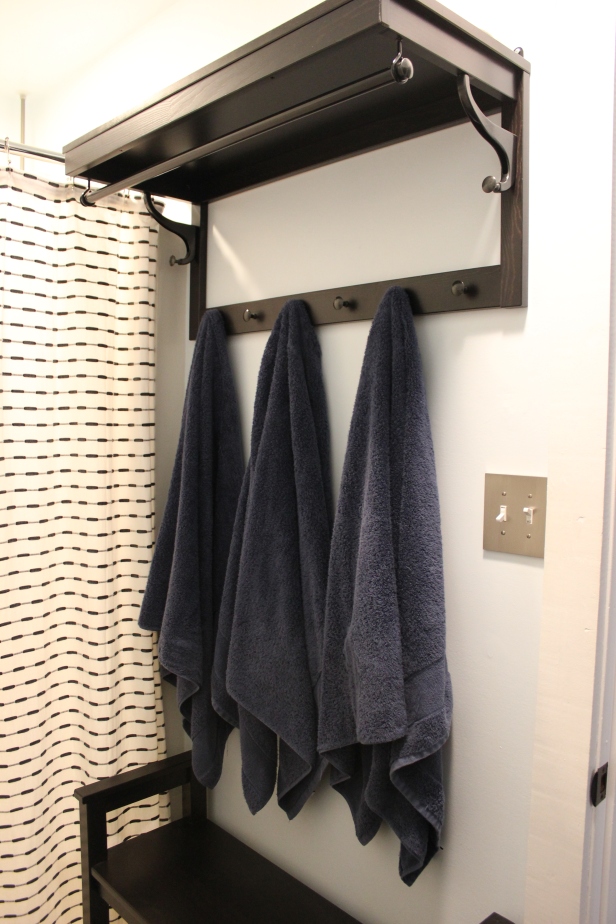
Even though our tiny bathroom was looking so much prettier, she still had serious storage issues (just like the rest of our little house). The new console is far more efficient than our former model, but we decided to add extra storage by installing open shelving above the toilet. And little storage trays are my best friends…they contain all our bathroom essentials so neatly. Our towel rack is actually a hat rack from IKEA (the Hemnes hat rack in black-brown) and we also added the Hemnes shoe bench for extra storage (and a place to make drying off from a hot shower an easier feat). It’s a lot to squeeze into a tiny bathroom, but we wanted to up the ante on storage.
Here’s the little bathroom almost complete….

I almost forgot to mention the new door hardware and stain! The knob is the Defiant Hartford Aged Bronze privacy knob (Home Depot) and is a huge improvement because it actually locks (a great feature to have on your bathroom doors when you live with children)! For the stain, I chose Minwax Polyshades Espresso Satin. It took two coats to get a finish I was happy with (and 2 days of elbow grease and drying time). I’ll eventually be redoing all the doors in the house to match, but there’s 11 more of these puppies (so it’s going to take a while)!
For now, let’s just call it a day and look at some more pretty pictures…


Looks amazing! I can’t wait to test it out myself!
LikeLike
Looks great! And congratulations on the blog!!
LikeLike
Absolutely brilliant idea for a towel rack and gorgeous results.
LikeLike
Gorgeous! You have serious skills.
LikeLike
Great clean lines & contrasting colors. And what about that trim!!! Nicely done.
LikeLike
Wow amazing job! You are so talented!
LikeLike
Super cute!
LikeLike
WOW!! I love it! Got some great ideas for my bathroom redo! So happy for you!
LikeLike
Looks amazing! Fantastic job.
LikeLike
AMAZING job
LikeLike
Excellent job Miss Moof!❤️
LikeLike